• Skip to primary navigation
  • Skip to main content
  • Skip to primary sidebar
Kountrygirl Farm

Kountrygirl Farm

Birds, Bees, Flowers, Trees...and Goats

  • From the Garden
  • In the Kitchen
  • Herds, Flocks, and Hives
  • Back at the Farm…(blog)
You are here: Home / Back at the Farm..

Back at the Farm..

Capturing our Honey Bees after they Swarmed

June 13, 2021 by Cari

We found two swarms of bees hanging in a tree in our yard. Even though we are new to beekeeping we decided to capture the swarms. As it is, we ended up with an open hive in a pretty steady downpour, but we’ll get to that. One swarm was added to a queenless hive while the other was marched into a new nucleus box to start a new hive.

Discovery

Looked like chickens in the tree, but it was bees swarming
Two swarms of bees hanging in a holly tree

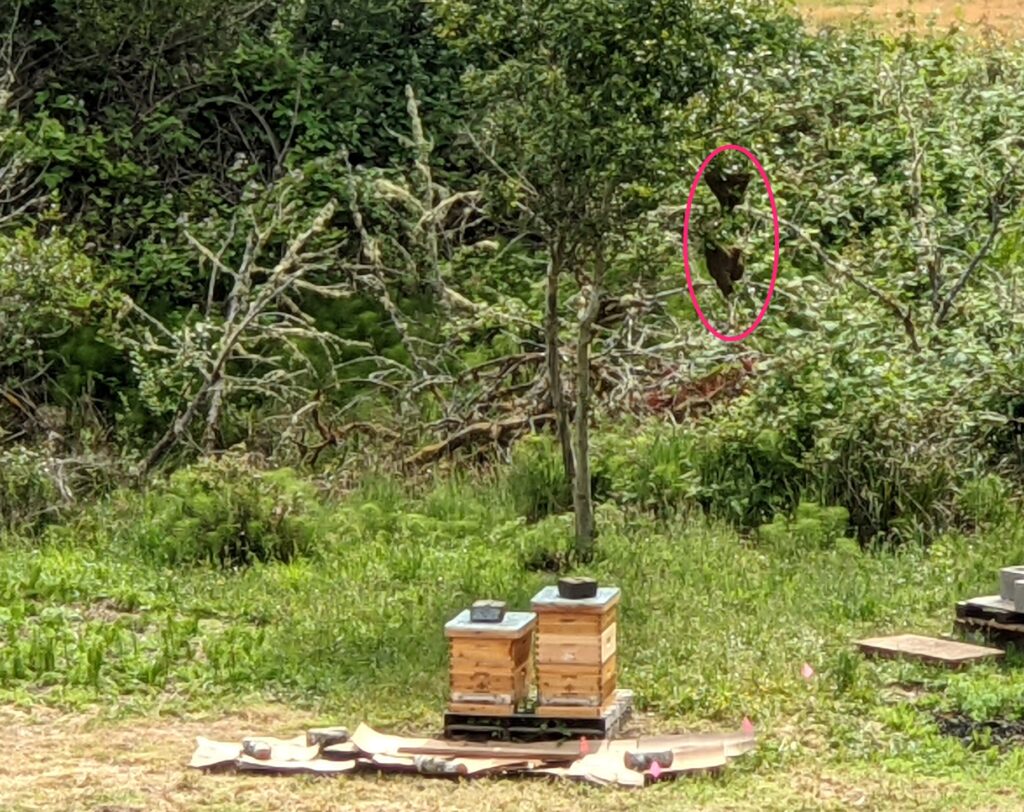
Yesterday when looking over what I hope will be next year’s expanded, deer-proof Garden, I noticed a couple of large birds in a tree above the hives in the pasture. It wasn’t unusual since we’d seen a pair of black hawks hanging out and hunting nearby over the past week. But these looked like chickens. Since our chickens were all accounted for (after a quick headcount), I was curious as to where these birds came from and what type they were. After watching them for a bit I realized they weren’t moving like any bird I’d seen before, so I moved a bit closer to get a better look without scaring them away. That’s when I noticed bees flying around the “birds” and realized we had bee swarms. We had bee swarms! We can setup new hives! Can we setup new hives? Should we? Now what?

Preparation

Gathering equipment prior to swarm capture

With limited knowledge on what we were actually doing, we right away found a YouTube video from Cotswold Bees that got us up to speed. It was important to make a game plan quickly because swarms can move within several hours. With two separate groups of bees in the same tree the urgency was increased. Also working against us was the 100% chance of constant, coastal rain expected to start in the afternoon. Working with the bees in wet weather is to be avoided when possible, but beekeeping in the Pacific Northwest comes with some precipitation expected.

Equipment:
* Two medium cardboard boxes
* Two queen excluders
* Towels - used for weighing down the boxes in the wind and covering the ramp
* One 5-frame nucleus box with frames
* One 10-frame deep brood box with frames
* The Beekeepers Basics Box (smoker, hive tool, etc)
* A sheet of newspaper
* Pruners
* Stepping stool or ladder

Capture

Catching bees
Accidentally scattering bees

We decided to trim and then cut down the branches since we wanted to have the best chance of catching the queen. Shaking the branch might fling the queen elsewhere and all the worker bees would follow. We held a cardboard box under the branch and literally caught the falling bundle of bees.

The first swarm scattered a bit, but we were more prepared and were able to catch the second one more intact.

Bees finding their way to their colony

Once the majority of the bees were captured in each cardboard box, hopefully with the queens, they were covered with a queen excluder to keep her in the box. Beekeeping is all about them queens! Bees rise to the top, so we flipped the box upside down and placed it and the excluder propped up on a couple of stones to allow straggler bees to find their queen and colony. We left them alone for a couple of hours to settle in.

Rehoming in a Queenless Hive

Newspaper placed between brood boxes as a temporary barrier
Newspaper after bees removed it from the hive

When we inspected the Astoria hive we found no eggs or larva and very little capped brood. This is an indication of a queenless hive. There were also no queen cells since we had destroyed those in the previous inspection. So, we decided to add one of the retrieved swarms to Astoria.

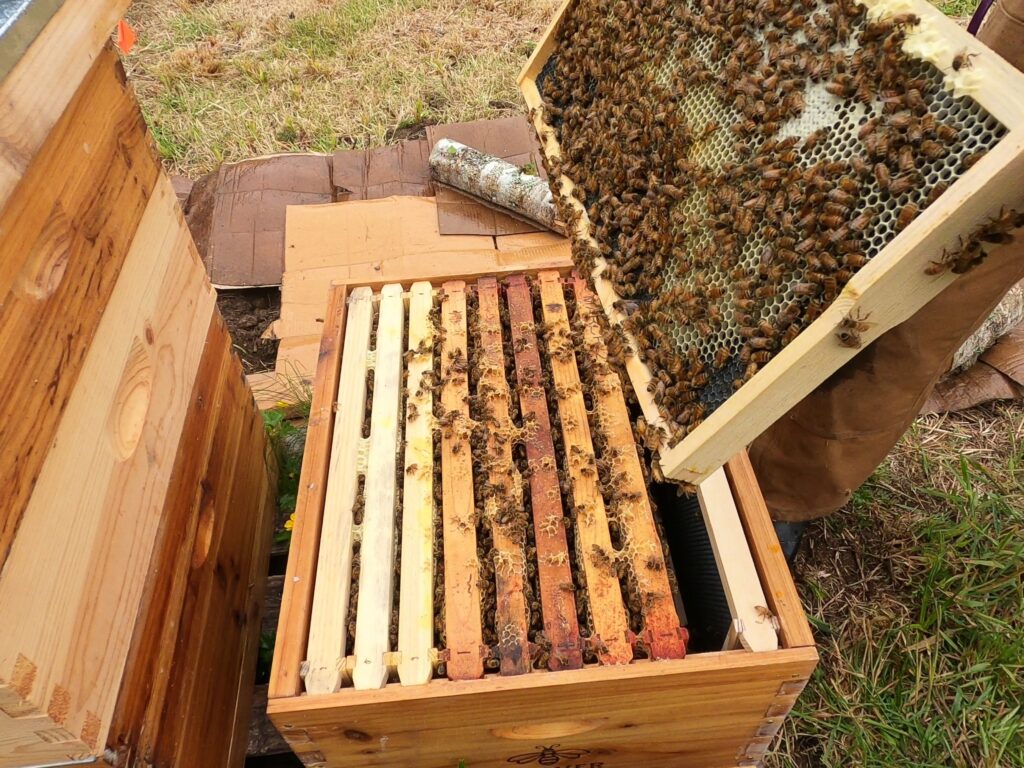
A frame of honey and pollen was moved from the lower brood box into a new brood box to provide some stores. A sheet of newspaper was placed on top the of existing brood box and the new brood box on top. The newspaper allows the bees some time to get adjusted to each other as they combine into one colony. The bees were added by slapping the bottom of the upturned box and knocking the bees down into the brood box.

In full disclosure: this could be a mistake if we have a laying worker, but we’ll keep and eye on it and let you know how it turns out.

Rehoming in a 5-frame Nucleus Box

Bees marching into a nucleus box
A frame of honey and pollen from the Astoria hive was added to the nuc to provides stores and scent to attract the bees.

Okay, this was probably the coolest thing that happened on this swarm retrieval day. The bees just walked into the nucleus box (nuc).

Bees will walk uphill so providing a ramp up to their new home is like a welcome mat for them. The box was tapped to knock the bees onto the ramp. It took about half an hour for the whole swarm to make their way into their new home.

Conclusions & Lessons Learned

It is important to have trusted resources to turn to when timely information is needed.

Have extra supplies on hand because both the local stores and online stores may run low in mid-season. These leads to an important lesson on what it costs to keep bees. The answer is more than expected and most of the cost is in woodware to house the bees.

We suspect both swarms were from our Camas hive since there were multiple queen cells the last time we checked. Swarm control is Beekeeping 101 and if we had taken the appropriate actions at the appropriate time, we would have been able to prevent the swarms in the first place. We know this will come with time and are glad we were able to catch the swarms and possibly save the Astoria hive.

*Remove the flaps from the open end of each cardboard box to ease bee removal

Filed Under: Bees, Herds, Flocks, & Hives Tagged With: Astoria Hive, Camas Hive, Cascadia Hive

Honey Simple Syrup

October 31, 2020 by Cari

Honey Simple Syrup

Ingredients

1 cup honey

1/4 cup water

Instructions

Add honey and water to a small pan.

Heat on low until water evaporates and honey is a syrup consistency, about an hour.

Tips:1. Add a Jalepeño for a spicy alternative. Great in a Margarita 2. Or try garlic infused honey in a Bloody Mary.

Filed Under: In the Kitchen, Sauces, Dips, and Spices Tagged With: Honey

Plum Bread-Gluten Free

September 3, 2020 by Steve

INGREDIENTS

  • 2 cups diced plums (Nectarines or Peaches can also be used)
  • 3 cups gluten free all purpose flour
  • 1 cup butter, softened
  • 1 1/2 cups coconut sugar
  • 2 teaspoons vanilla
  • 4 eggs, room temp
  • 1 teaspoon salt
  • 1 teaspoon cream of tartar
  • 1 teaspoon baking soda
  • 3/4 cup sour cream

INSTRUCTIONS

  1. Preheat oven to 350 degrees.
  2. Cream butter sugar and vanilla together until fluffy.
  3. Add eggs one at a time, beat after each addition.
  4. Sift together flour, salt, cream of tartar, and baking soda.
  5. Add about 1/3 of the sour cream to the mixture then 1/3 of the flour mixture, alternating until all is added.
  6. Fill two greased and floured bread pans 1/2 full with batter, then add 1/4 of the fruit to each pan, then the remaining batter and top with the remaining fruit.
  7. Bake at 350 degrees for about 55-60 minutes, or until a toothpick inserted comes out clean.
  8. Cool in the pan for 15-20 minutes and turn onto a platter.
  9. Makes two loaves, freezes well.

Filed Under: In the Kitchen, Treats Tagged With: Gluten Free

Low sugar plum jam

September 3, 2020 by Steve

INGREDIENTS

  • 4 1/2 cups pitted, chopped plums
  • 1/2 cup water
  • 2 1/2 cups Demerara sugar
  • 1/2 teaspoon butter
  • 1 (1.75 ounce) package Pamona’s Universal powdered fruit pectin (comes with calcium powder)
  • 1 teaspoon calcium water.
  • 8 each half-pint canning jars with lids and rings

INSTRUCTIONS

  1. Place the plums and water into a large pot, and bring to a boil. Reduce heat to medium-low, cover, and simmer for 5 minutes. Stir in the sugar, and add butter to reduce foaming, if needed. Bring the mixture to a full, rolling boil over high heat, stirring constantly, and then mix in the pectin and calcium water quickly. Return the jam to a full boil, and boil for 1 minute, stirring constantly. Remove from heat, and skim off and discard any foam.
  2. Sterilize the jars and lids in boiling water for at least 5 minutes. Pack the plum jam into the hot, sterilized jars, filling the jars to within 1/8 inch of the top. Run a knife or a thin spatula around the insides of the jars after they have been filled to remove any air bubbles. Wipe the rims of the jars with a moist paper towel to remove any food residue. Top with lids, and screw on rings.
  3. Place a rack in the bottom of a large stockpot and fill halfway with water. Bring to a boil over high heat, then carefully lower the jars into the pot using a holder. Leave a 2 inch space between the jars. Pour in more boiling water if necessary until the water level is at least 1 inch above the tops of the jars. Bring the water to a full boil, cover the pot, and process for 10 minutes.
  4. Remove the jars from the stockpot and place onto a cloth-covered or wood surface, several inches apart, until cool. Once cool, press the top of each lid with a finger, ensuring that the seal is tight (lid does not move up or down at all). Store in a cool, dark area. Refrigerate opened jars for up to 3 weeks.

Filed Under: In the Kitchen, Sauces, Dips, and Spices

Spa Break

September 1, 2020 by Steve

https://kountrygirl.com/hs/wp-content/uploads/2020/08/Mable-n-Goldie-bathing.mp4

In case you didn’t already know, chickens are fun. Even if they didn’t provide us with eggs daily, their personalities make them an enjoyable addition to our family. Our original 4, Buffy- a Rhode Island Red, Daisy- a Blue Splash Maran, Goldie-a Golden laced Wyandotte, and Mable- a Lavender Orpington will be our forever pets, and maybe 3 or 4 more.

Filed Under: Chickens, Herds, Flocks, & Hives

My new love of Dahlias

August 30, 2020 by Cari

Yesterday is the day I officially fell in love with Dahlias. Stopped for $5 bouquets at a home on a country road while Steve and I were out for a drive.
We meet Ray, who’s been growing, showing, and judging Dahlias for decades. He gave us a tour and tips on growing big, beautiful blooms. You know this girl is already planning a Dahlia garden for next year.
So pretty!!!

Filed Under: From the Garden

  • Page 1
  • Page 2
  • Page 3
  • Go to Next Page »

Primary Sidebar

  • Facebook

Copyright © 2025 Kountrygirl Farm

  • Privacy Policy